Give the Gift of Magnetism
I ask you, is there anything nicer, anything more luxurious, than a magnet clasp? The subtle, whispered “whump” of that lid landing with just the right pull? Drop that glass of sherry, put the wrapping paper down, kiss your grandmother goodnight, and go get your knife. It’s magnet time. Let’s talk about what you need.
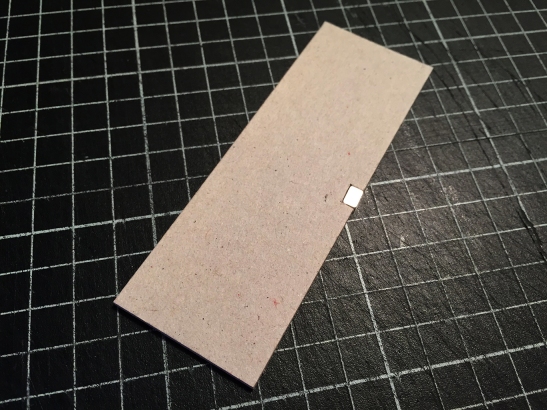
Rare. Earth. Magnets. So strong. So small. So bad for you if you swallow them. I typically use two different magnets for two different jobs. The first, a 9mm x 1mm disk,* is ideal for making a closure with a flap that sits flush on another flat surface. The second, a 6mm x 4mm x 2mm bar, is best for a hinged lid that snaps into place against the edge of a box wall.
I order both of these magnets in the UK from a company called first4magnets. Now that I am looking at the packaging below, I realize that my disks* are actually 10mm in diameter. I am currently tickling my niece 3,000 miles away from my bindery and all of my magnets, so there is no time to correct my charming magnet photograph above. You’ll bear with me, right? It is the holidays after all.
Both magnets are reasonably priced, somewhere under £3 for ten. In the USA you can order them from a variety of sources. Talas sells 9mm x 1.5mm disks for $5.80 per dozen.
UPDATE Several of you have suggested K & J Magnetics as a great source for these magnets. Thanks Daniel, Nancy and Ellen! Daniel suggests the 5mm discs used in combination with a screw punch and a 5mm bit to dig into your board. Elizabeth points out that she uses her used olfa blades as the attractive surface (see below,) but beware of those blades, especially when using such strong magnets. On a safety note, Ellen has pointed out that the magnets are so strong that if they slam together, they can shatter. be very careful with them and make sure you don’t get pinched.
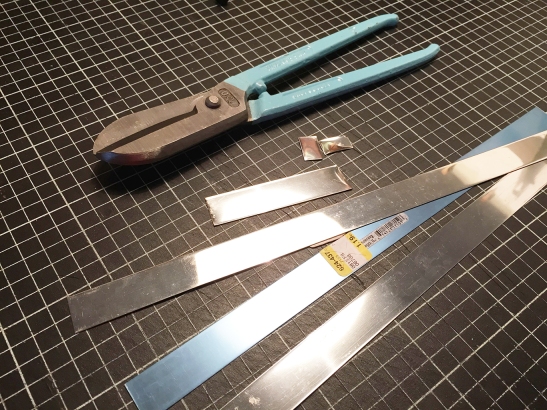
Once your magnets have arrived, you need to find some metal to be an attractive surface. My current favorite is a thin 3/4″ strip of steel from K&S. You can often find them in the K&S display at small hardware stores in the US.
If you are in the UK and you have a favorite source for something like this, please let me know. I ordered some steel a while back, but it is a bit thick for my taste so I tend to stock up on K&S strips when I am back home.
Get yourself a pair of tin snips (like my adorable blue set above) and cut a piece from the strip. The snips will bend the metal, so set your piece on a metal surface and tap on it with a hammer to work out the worst of it.
You’ve got your magnet, you’ve got your metal, you are READY TO GO. The rest is a bit of common sense. You are going to bury your metal and your magnet into the board so that when the box is completely covered and assembled, that pair meets in just the right place.
For the wrapper style attachment, treat your disk magnet and your metal just as you would an inset label. I usually bury the metal into one of the boards before any covering at all and then position and bury the magnet after the wrapper is half covered. If things look a bit rough and you are worried about the clasp being visible or lumpy after covering, you can add paper on top and do some fine sanding before covering, but keep in mind that every layer that comes between the magnet and the metal will weaken the attraction, and it goes without saying that weak attractions are dweebs. For larger boxes, place another magnet/metal pair in another spot.
For the lidded box, I bury the magnet in the box wall before I even assemble the box. I use the 2mm wide magnets specifically because I tend to use 2mm grayboard for my boxes. I cut a 4mm x 6mm notch in the board and adhere the magnet. Sometimes I use PVA, sometimes I use superglue. Whatever floats your boat.
Then I assemble the board and cover as I would for any other box. When I make the hinged lid, I use the buried magnet to help me determine where the metal should be on the lid. I bury the metal after the hinged lid has been covered halfway, then I adhere the pastedowns. kaboom.
I’ve puzzled out these methods out of necessity, but I’d love to know what other people are doing. Do you have any magnet tips or resources? Please let me know and I will post an update.
I owe a huge thanks to Erin Fletcher at Herringbone Bindery for posting an interview with me on Flash of the Hand. Book Artist of the Month! You can read the interview here, and subsequent postings about a few of my books can be found at the links below. Thanks Erin!
Read about Biography (2010)
Read about Al-Mutanabbi Street (2009)
Read about Simulations on a Tw0 Dimensional Grid (2013)
Anyhoo, Happy Holidays, Everyone!
Boxmaking 4ever.
Love,
Big Jump Press
*disk? disc? disk? disc?
*disks? discs? disks? discs?


Hi, thanks for the information. You can purchase 100 magnets in different sizes on Amazon for between $6-8. I have been using 2 magnets for my closures because of the price but I like the idea of using the metal. Peggy Seeger http://www.persimmonpaperworks.com.
Sent from my iPhone
>
Thanks so much Peggy! That’s great information. I started with two magnets as well, but have found the metal is more forgiving.
I like K&J Magnetics in the US, http://www.kjmagnetics.com, plus it goes with K&S metals. If you use 5mm diameter disque magnets you can make a recess with a Japanese screw punch.
Thanks Daniel, that’s great. That 5mm magnet/screw punch tip is such a great idea. I might order some before I head back.
Daniel beat me to it, but I use K&J too (and the K&S metal strips). One thing to keep in mind as that they are so strong you have to be careful. When I first started using them, I didn’t realize that you should remove any from the worktable that you aren’t actively using. Suddenly, my magnet flew toward the others without warning and crashed so hard against them that it shattered. You also don’t want to get your finger caught between them. (I feel so dumb saying that, but I speak from experience. Alas.) But I wouldn’t want to put anyone off from using them. They’re terrific! And with the metal, there’s no worry about matching polarity.
Thanks for this post. As usual, you’ve sparked ideas that will make things easier (hadn’t thought about the notch…). Great blog.
Hi Ellen! Thanks for that safety reminder, I too had a magnet shatter and that was a shock! I will update the post soon with your warning and a link to K&J. Best wishes and Happy New Year!
I confess, I actually found it entertaining to watch the magnet suddenly fly on its own across the table. What can I say… Although I should add, perhaps, that it’s also a very good idea to keep, say, scalpels not too close by as well. That kind of flying around isn’t nearly as entertaining…
And best wishes and a happy (and A&E-free) 2015 to you as well!
Happy New Year to you too!!! May your scalpels keep clear of your magnets in 2015!
What a fun post, with such good information! Thanks again for sharing. I too like to use magnets on my boxes – it makes them magical! I get my magnets from http://www.kjmagnetics.com, K & J Magnetics, a delightful company with much imagination, a sense of humor and, most important, a wonderful and varied supply of powerful magnets.
I have just used two magnets on each box, never a piece of concealed metal. You have just about cut my cost in half and simplified the whole process by that one suggestion. Thanks so much!
Warmly, and with a Seasons Greetings, Nancy Akerly Liberty Grove Paper Arts Sister Bay, WI, USA
Sent from my iPad Liberty Grove Paper Arts http://www.libertygrovepaperarts.com
>
Hi Nancy! Thanks so much for your message! I am glad that the magnet + metal trick will help you out, and thanks so much for the tip on K&J Magnetics. I will update this post soon with that info! Hope you had a great New Year, Happy 2015!
Sarah
Thanks, Sarah—Happy Holidays to you!
Vicki and I are now living in Florence, arrived here on September 8th.
I’m slowly getting back into bookmaking. Have been working with Lyall Harris and Patricia Silva here in Florence. In January I’m going to start instruction with Enrico Giannini, a fifth generation Florentine binder, very excited about that. Vicki and I have to come to Britain in the new year, so I’m looking forward to visiting you at some point. Cheers, Bob
Hi Bob! Let me know when you are coming and I look forward to seeing you! Enjoy Florence, I am so jealous of your forthcoming lessons!
Great post. I just use old Olfa knife blades for my metal. The shape is a bit funny but the magnet finds them.
Hi Elizabeth! What a great idea! Thanks for that!